Homemade Arcade Joystick
After playing with MAME and viewing other people's home projects,
I got interested in arcade parts, joysticks, and emulation (MAME, mostly) and
successfully built an Arcade Joystick using only a soldering iron, a hole saw, a trip
to the hardware store, and of course parts ordered from the internet.
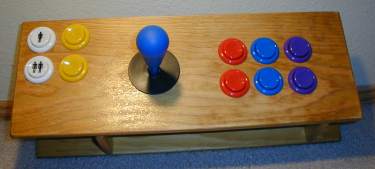
And here it is! I am very proud of it, but
version 2 will have some changes in button placement. I think this looks more ascetically
pleasing and well balanced than all of the diagonal button arrangements I see in other's projects,
but it is much more uncomfortable on the hands. But the biggest problem is that the heel of
your hand sits on the edge or corner of the wood- not a long term comfortable position!
Angling the buttons and using a bigger piece of wood would provide a more comfortable
resting place for your hand. Less irritating, but still something that could be improved,
idealy both hands should be equally far from you, that is, the center of your hands should be on the same
plane, the same distance from your chest.
The current button arrangement
places the tips of your button fingers in the same plane
as the center of your joystick hand. It is not very bad, but can be improved by moving
the buttons up and angling them. My next theory for "the best position" can be visualized
by making two fists comfortably in front of you as if you were grasping two joysticks.
Now, without moving your wrist, open your right hand and rotate your wrist to a comfortable
spot in the horizontal plane as if you were pushing buttons. Where your fingers are resting
is ideal spot for the basic four buttons! That is my new theory, at least.
When I decided to take the plunge and
start building the joystick, I ordered the arcade parts, bought wood, stain and
polyeurothane from the local hardware store, and designed my layout, in that order.
Actually, I made an Atari / Commodore64 compatable joystick first, to hone my skills.
It worked great, but I did not stain or polyeurothane it so it is not nearly so flashy
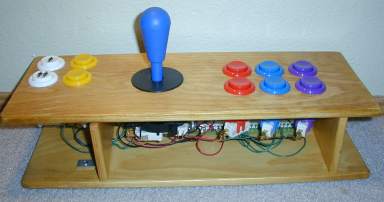
and does not have that finished feel. I cut my wood, drilled my holes, learned to stain
and polyeurothane wood (this was the first project on which I have done either) assembled
the hardware, soldered wires down, and screwed it all together!
The hardware part is actually easy
to put together, but how to get
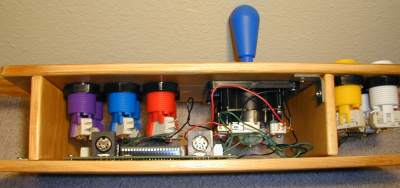
the button pushes and joystick motions into the computer? Enter a very cool and reasonably
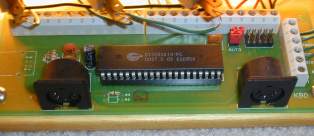
priced board: The I-PAC! This cool device takes many button inputs and sends them to the
computer as keypresses. It can act either as a standard keyboard or a USB keyboard and
works flawlessly. It designed with enough connections to support 2 full joystick and button
stations plus the one and two player start and coin buttons. I only used one joystick
station myself, "wasting" half of the board's capabilities. The IPAC works seamlessly with MAME
and since it is just sending keypresses can be used in other games too- though it helps
if the game allows you to redefine the controls to the same keys the joystick is sending!
The board can apparently be customized to send other keypresses as well, but I have not
tried it.
By the way, the joystick just has four button switches in it and works very much like
the arrow-keys on a keyboard. All 'old' joysticks worked this way, only the newer Arcade
and Computer Joysticks are more fancy. Lots of gamepads still work this way- 4 directional
switches allowing 8 directions including diagonals, so this method cannot be considered
too archaic.
The whole project came in around the $100 dollar mark, as I recall. (Which probably means
it was a bit higher!) It was a lot of fun to do, and makes playing MAME games "feel right!"
My Atari controler is great, too, and I wish I had had as sturdy a joystick when I first
played on my Atari 400 as a kid. The success of this project made me investigate and
eventually work on my USB project, and has tempted me to consider
building a second version with improvements. I think I will try to get a rotary joystick
to work next time, "Ikari Warriors" style!
Version 2 is finished! It is a major piece of furnature, too. My wood skills are improving,
though I am a ways from giving Norm any challenge. I felt my first joystick was too small, and
so increased the size for comfort- I think I over did it. However, this will also make a good
starter control panel for a cabinet, so I am actually glad it worked out this way. This joystick is a
lap-full, but works well enough as it is. So, enough commentary; I built a rotating "Ikari Warriors"
style rotary interface with comfortable button placement, lots of room for resting hands comfortably,
and serindepitously, enough room to mount a motherboard in the base... but that is yet another project!
In addtion to duplicating my above work, I used Druin's rotary interface to support a Happ rotary
joystick. All the other hardware is the same. I placed the buttons more by feel than
engineering this time (I actually got 1 & 5 slightly too close to each other and to the joystick:
nothing a small dremmel job didn't immediately fix)and I am very pleased with the results. I am
also happy with the asthetic outcome, though aside from color selection I was paying little
attention to that aspect of design. My wood staining and polyurathane work improved drastically,
as did my efforts to make the box very close to truly "square." I am still using metal angle brackets
and screws to hold the thing together; in spite of some research and exploratory woodworking, I
decided my "clever hidden furnature assembly" work needs a lot of developing. There is certainly
nothing structurally wrong with the angle brackets, and chrome on light walnut stain looks just fine,
especially when it is all on the inside anyway. As a last note, if I do end up using this as a control
panel for a cabinet, I will probably close off the front side as well, but until then the "open box"
shelf styling is just fine! All counted, I think this was around a $180 project, with the
I-PAC and Druin's Rotary Interface accounting for $120 of that, the joystick was $35ish and
the buttons, wood, and miscalenous stuff filling up the rest. The rotary part of the project
added quite substantial hit to the project's bottom line.
And when I get a chance, I will post some pictures, and not just talk about it!
Hm, now I am thinking about the future, Version 3! Oscar dials, trackballs, and Star-Wars Yoke,
and a full cabinet... but none of that will happen anytime soon.
Thanks and Links
- Andy's IPAC board was my original eye-opener and inspiration: "A single chip USB controller!
I wonder if I could do that?". Andy is at www.spaceinvaders.uk.com,
and IPACs and more can be found at www.ULTIMARC.com.
- The arcade hardware is from Happ controls, a very cool place. www.happcontrols.com
- Druin's LS30 rotary interface is a great little board that converts the 12 rotation positions of the rotary joystick into the necessary Left-Right key signals for the I-PAC/Mame. It is well worth the cash! members.rogers.com/druins22/ls30
- Many other similar projects are scattered across the web; one excellent collection is at www.arcadecontrols.com
- Arcade Emulators are what inspires these projects, I suggest starting with the famous and flexible MAME. www.mame.net
- An Oscar looks like a good way to add Spinners and Steering Wheels to your project, though it has competitors, too! www.oscarcontrols.com
Thanks for providing Cool Stuff(tm)!
|
