USB generic interface board
Concept
Wrap a Cypress EZ-USB controller chip into a prototyping and test board. This board
can be used to develop small hardware projects for the PC, including but not limited
to custom keyboards, joysticks, lights, and even little robots.
Current Status
Jan-17-2002
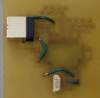
I finally cleaned up the connections, got up my nerve, finished fully backing up my software, and
plugged my circuit board into my Windows 2000 system. The great news, nothing died horrible deaths!
I unplugged it and re-plugged it and it had the same behavior; so far so good. I have no drivers for
it yet, and the USB software subsystem says to the effect of "something unknown is plugged in but no
suitable drivers are installed". Hopefully this is a good sign. Now the task is to figure out basic Cypress EZ-USB
drivers.
Nov-03-2001
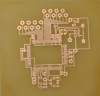
I got a perfect circuit board etch, and soldered my first full test board! I got the chip on,
but may have a pin alignment problem. <sad face> I have the usb connector, smd resistors and caps,
and the crystal all properly attached, though! A little cleanup with an exacto knife first,
then hopefully I can confidently plug it in and see how it does.
I hope that just a little more playing with hardware will leave me with a working prototype
board and that I can start playing with the software side of things. And then following that
will be the Version2 hardware design (bringing out all 40 rather than just 16 I/O ports)and
daughter boards, and so fort!
Uses
- Electrical Engeneering/ Comp. Sci. hobbyist platform
- Custom Keyboard Interfaces (Handicap, customized layouts)
- Data Gathering/ Sampling/ Input
- Unique peripherals (Arcade joysticks, Atari Disk Drive access)
- Computer control of electronics, motors, relays
Features
- Wraps a Cypress EZ-USB chip in a 'project board' type
application
- Downloadable & editable 'driver' firmware for
experimentation
- easily attachable to project 'daughterboard'
Tools and Process
- I use Toner Transfer Paper to print the circuit board with my nice HP LaserJet 1200.
The paper is the "Toner Transfer System" (TTS) from
www.DynaArt.com.
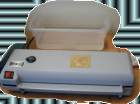
- Then, using my SuperFuser, I apply pressure and
heat to fuse the transfer paper to a copper clad pcb board. (It works better than
a clothes iron!) After the SuperFuser the board+paper goes into a tub of water and
the paper separates from the toner, and then I have a circuit printed on copper! The
super fuser is again a www.DynaArt.com product.
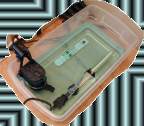
- After the water bath, the circuit board-to-be is given an acid (etchant) bath, removing
all exposed copper, leaving the circut as printed. I etch with Sodium Persulfate, giving
more business to www.DynaArt.com since they taught
me how! However, my etchant tank is made inexpensively from a plastic tub from Target and
an aquarium heater, pump and thermometer from PetSmart.
- All that is left is to drill the appropriate holes and solder down the wires,
components, and connectors! My cool small drill press and bits were happily sold to me
from www.DynaArt.com, and the soldering iron was
from my local Future Active electronics store.
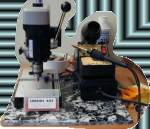
- Viola! A circuit board.
Thanks and Links
- Andy's IPAC board was my original eye-opener and inspiration: "A single chip USB controller!
I wonder if I could do that?". Andy's at www.spaceinvaders.uk.com,
and IPACs and more can be found at www.ULTIMARC.com.
- After some research, I decided to work with a Cypress EZ-USB controller because of its
downloadable firmware. That way there is no need to mess with EEPROMS for software testing. Very Cool! www.cypress.com
- A web search turned up the cool work that Edward Schlunder has done,
and his work and occasional help has made my learning curve much less painful!
www.ajusd.org/~edward/ezproto
- And without www.DynaArt.com I would not have
figured how quite to accomplish any of this in my apartment.
Thanks and Kudos to you all!
|
